
Agent Analytics works by reading the AI-bot visits recorded at your site's edge. Webflow, however, doesn't expose server logs or let you run server-side code.
A workaround is to place a free Cloudflare account in front of your Webflow site. Cloudflare sees every request (including AI crawlers), a lightweight OtterlyAI Worker records the AI-bot visits, and everything else passes straight through to Webflow untouched. Webflow officially supports this setup, it's known as "Orange-to-Orange", and it has no effect on your visitors or your site's performance.
This guide walks through the whole setup.
Before you start
⚠️ Your Webflow site needs a paid Site plan — not a Workspace plan.
Webflow sells two different kinds of plan, and it's easy to buy the wrong one:
- Workspace plans (Starter, Freelancer, Agency) cover seats and collaboration. They do not allow custom domains.
- Site plans (Basic, Premium, Enterprise) are bought per site under Site settings → Plans, and are what unlock a custom domain.
Basic is enough if your site has no CMS collections. If it does, Webflow requires Premium.
You'll also need:
- Access to your domain's registrar (where you bought the domain), so you can change its nameservers.
- A free Cloudflare account. Create one at dash.cloudflare.com if you don't already have one.
Step 1 — Webflow: confirm the plan and add the domain
- Open Site settings → Plans. The Website tab must show Basic, Premium or Enterprise as current. If it shows Starter (or only a Workspace plan), purchase a Site plan before continuing.
- Open Site settings → Publishing.
- Click Add a custom domain → Manually add domain. Enter
yourdomain.comand accept addingwww.yourdomain.comas well. - Click Make default on
www.yourdomain.com.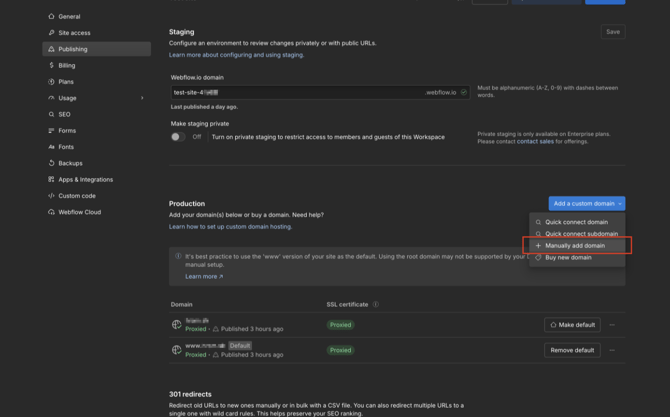
- Copy the
_webflowTXT record value shown under "Verification required" — you'll need it in Step 2. Ignore the A record and theproxy-ssl.webflow.comCNAME; you won't use them.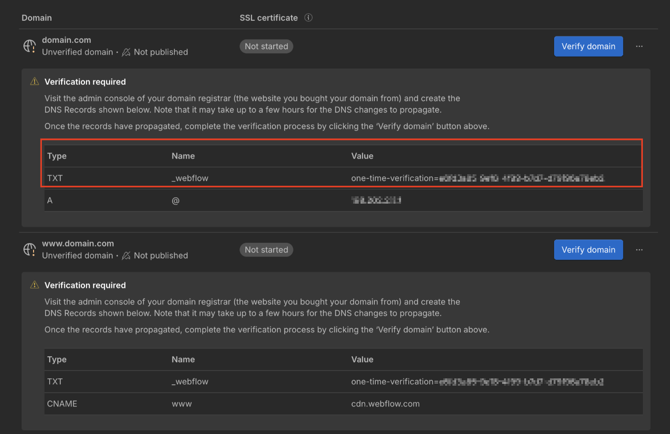
Step 2 — Cloudflare: add the zone
- In Cloudflare, click Add a domain, enter
yourdomain.com, and choose the Free plan. - Review the imported DNS records. Delete any A or CNAME records for
@andwwwthat point to your old host. Keep your MX and TXT records — they carry your email settings. - Add these three records:
The orange cloud (Proxied) on the two CNAMEs is what routes traffic through Cloudflare; this is the "Orange" part of Orange-to-Orange, and it's what lets Agent Analytics see AI-bot visits.Type Name Value Proxy status CNAME @cdn.webflow.comProxied 🟠 CNAME wwwcdn.webflow.comProxied 🟠 TXT _webflowone-time-verification=<value you copied in Step 1>DNS only ⚪ - Click Continue to activation and note the two nameservers Cloudflare assigns you, you'll need them in Step 3.
Step 3 — Registrar: switch nameservers
- At your registrar, replace the current nameservers with the two Cloudflare gave you in Step 2. If DNSSEC is enabled, turn it off.
- Back in Cloudflare, click Check nameservers. Activation usually takes a few minutes, occasionally a few hours.
Step 4 — Cloudflare: zone settings
- SSL/TLS → Overview: set the encryption mode to Full (strict).
- Security → Bots: turn Bot Fight Mode off.
- AI Crawl Control: make sure no category is blocked.
⚠️ This is the most common reason Agent Analytics shows no data. Cloudflare blocks AI crawlers by default on new zones, and a blocked crawler never reaches your site or the OtterlyAI Worker, so it can't be counted. Confirm AI Crawl Control is not blocking anything before moving on.
Step 5 — Webflow: verify and publish
- Once the Cloudflare zone shows Active, return to Webflow Site settings → Publishing and click Verify domain on both domains.
- Click Publish, tick the production domains, and publish. The domains may keep showing an "Update needed" badge, this is expected with the Cloudflare proxy and can be ignored as long as the site loads.
- Open
https://www.yourdomain.comand confirm the site loads normally.
Step 6 — Cloudflare: create an API token for OtterlyAI - A full guide.
OtterlyAI needs a scoped API token to deploy and manage the Worker that records AI-bot visits.
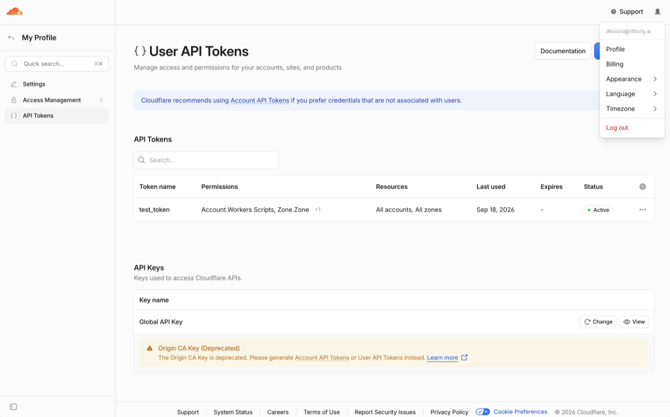
- Click your profile icon → API Tokens → Create Token → Custom token. Set these permissions:
Under Zone Resources, include onlyScope Permission Access Account Workers Scripts Edit Zone Workers Routes Edit Zone Zone Read yourdomain.com. - Continue to the summary, click Create Token, and copy the token. It is shown only once.
🔒 Treat this token like a password. Keep the permissions and zone scoped exactly as above — that's all OtterlyAI needs, and don't share or reuse it elsewhere. If it's ever exposed, delete it in Cloudflare and generate a new one.
Step 7 — OtterlyAI: connect
- In OtterlyAI, open the brand report whose domain is
yourdomain.com, then go to Agent analytics → Add data source. Choose Provider: Cloudflare, paste the token, click List zones, pickyourdomain.com, and click Deploy worker. - You'll see a confirmation with removal instructions. Over in Cloudflare, Workers Routes will now list an
otterly-agent-…worker on the routeyourdomain.com/.
That's it; AI-bot visits will start appearing in Agent Analytics as they happen. You can find more information about the connector in this article.
💡 Removing the connection later is easy: the confirmation in Step 7 includes removal instructions, and you can delete the
otterly-agent-…worker from Workers Routes in Cloudflare at any time.